Croppit user manual
This guide explains how to use Croppit day to day for farm staff. Open it any time from Admin → Help (or the footer). Help for people buying at the farm tablet is a separate page (Shop help / kiosk Help button). Nothing here runs in the background — help appears only when you open it.
1. What is Croppit?
Croppit is a multi-farm crop planning and field management tool for professional market gardens and permaculture operations (Switzerland).
It helps you manage culture zones on a map, field plantings, nursery pot series, harvest logs, seed inventory, notes, a shared crop catalog, and an optional farm-gate self-service shop (kiosk).
- Field — culture map, plantings, notes, pot allocation into soil
- Pots — nursery series, trays, status tracking
- Harvest — batch logging, lists, revenue stats
- Admin — account, organisation, catalog, shop, and this help
Data is always scoped to your current organisation. You never see another farm’s plantings, harvests, or private stock by accident.
2. Getting started
Sign in
Open the site and sign in with the account your farm administrator created or invited. You may use “remember me” on a trusted device. If two-factor authentication (2FA) is enabled on your account, enter the code from your authenticator app when prompted.
- Forgot password — use the reset link on the login screen (email must be configured on the server)
- Language — English, French, German, Italian, or Japanese under Admin → Language (or the language menu when signed out)
- Sign out — Admin → Log out
Use Croppit as an app on your phone
There is no separate App Store or Play Store app. Croppit is the website with a home-screen icon and a full-screen window. Admin → Account shows steps for this device when you are in a browser tab (the card hides once Croppit is already opening as an app).
- iPhone / iPad — open Croppit in Safari (not Chrome and not a link opened inside Mail, Instagram, or similar). Tap Share (square with an arrow) → Add to Home Screen → Add
- Android — in Chrome (or Edge / Samsung Internet), open the browser menu (⋮) → Install app or Add to Home screen. If Account shows Install Croppit, you can use that button instead
- In-app browsers cannot add to the home screen — use Open in Safari (iOS) or Open in Chrome (Android)
- On a trusted phone, tick Remember me when you sign in so the icon stays signed in
This is the same farm site. Plantings, maps, and shop stay on the server. Installing does not create a second copy of Croppit.
Your organisation
You may belong to more than one organisation (farm). The current org is shown under Admin. All field, pot, harvest, seed, and shop data you see belongs to that org. Switch organisation from Account when you work for more than one farm.
The special organisation “croppit” holds the shared botanical catalog (families, crops, varieties, shared tray patterns). It is maintained by the Croppit product team (Legio Sapiens), not by individual farm users. Farms use those shared rows every day; they do not become “croppit admins”. If a shared crop or variety is missing or wrong, contact the Croppit team rather than changing shared data yourself.
3. Roles and permissions
What you can do depends on your membership role in the current organisation:
- Observer — browse Field and Pots only (read-only); no harvest or data changes
- Employee / harvester (writer) — create and edit plantings, notes, harvest; no Catalog or Shop admin
- Manager — writers’ rights plus Catalog hub and Shop configuration
- Org admin — managers’ rights plus organisation profile and membership
- Platform admin — manage all organisations and the shared catalog setup (rare)
- Kiosk device — sell-only POS; no farm data editing
If a menu item is missing, your role does not include it. Ask an organisation admin to change your role if needed.
4. Field
Field is the main daily surface: culture zones on a map, plantings on beds, notes, and related tools.
Views
- Recent view — the culture zone you last worked on
- Zone view — the root area of that culture tree
- Org view — all top areas of the current organisation (empty zone selection)
Use the map to zoom into beds. Date-aware bed patterns show which plantings are active on a chosen date. Select a planting to open its details.
Presentation modes (expand under the map): colour coding heuristics and History (as-of date). Only one mode is “active” at a time — digging into history resets colour to preset zone colours; choosing a non-default colour mode returns the map to today.
- History as-of — scrub weeks past/future: zone outlines and colours from saved shape history, and plantings visible on that calendar day (row bed panel, groups/trees on the map, density)
- Today — live geometry and colour; no history join
- Ghost zones — hidden on the live map; may still appear in history if they existed on that date
Plantings
Writers can create and update field plantings (crop/variety, dates, status, environment, outcome, and other fields your farm uses). Plantings unify field culture with pot culture under the same data model.
- Delete — only while status is planned (keeps history once a planting is active or later)
- Add new zone — catalog managers see a one-line tool at the top of the tools column; it opens the new-zone wizard with the selected zone as the parent
- Move planting — with a planting selected, use Move planting in the tools column; pick a culture zone that is an ancestor of the current zone or a first-level child of it
- Notes and files — attach notes to plantings or field actions where configured
- Duplicate plantings — copy plantings onto a zone when replanting similar beds
- Pot allocation — put nursery pots into a field planting of type plant
- Revenue / harvest context — panels that summarise harvest stats for the selection where available
After you move a planting, the Field map follows the destination zone so you stay in context.
Choosing a variety
When you create or edit a planned planting (field or pots), seed inventory, or a catalog variety form, the same variety picker appears: flip-card info plus filters. Cascade is plant kind → family → crop → variety (one row per cultivar).
- Search — type a variety name, supplier ref, latin name, family, or crop name. Suggestions are cultivar + crop (not supplier). Picking one fills plant kind, family, crop, and variety. The supplier filter is left as you set it. Crop search uses multi-language crop names (your UI language and other languages), so e.g. “Sichuan” finds varieties under that crop even if the cultivar names differ
- Search timing — results update a short moment after you pause typing (avoids lag and clutter on phones)
- Supplier filter — preferred houses are listed first; others fold under Other suppliers. All preferred ticks the preferred set (the default). All available ticks every house. Unchecking everything reverts to all preferred. Org admins set the preferred list under Organisation settings (your own organisation cannot be removed). The filter stays when you change family/crop or re-pick another variety under the same crop. Plant kind, family, crop, and variety lists only show entries that have a supplier listing under the current filter (the catalog editor still shows everything). On Field and pots the offering list uses the same filter; the flip-card still shows every house
- Offering (field) — after the variety list, choose where this planting comes from: a supplier listing (e.g. Sativa seed) or a leftover pot series of that same cultivar grown in your org. The offering box is always on the form (empty until you pick a variety). Used-up pot series are not listed
- Offering (pots / nursery) — only supplier listings. Your own pots are not offered here, so you do not plant pots from pots
- Stock on the variety list is the total for that cultivar across listings. Seed inventory: after you choose a crop, the variety list is one row per supplier listing. Pick a row there to show the card and that lot alone in the table (even with no stock). Search pick shows all lots for that cultivar. All lots for this crop returns to the crop list without changing crop. A listing that is not enrolled yet is added as a 0-stock lot
- Flip-card — title is the variety name and id. The photo on the front is one of that cultivar’s pictures, picked at random each time. Flip for traits, calendar, who sells it (one line per listing; the name/ref opens that house’s product page), extra photos, stock for your org, and a link to edit the variety when you own the row
Planting layouts (row / group / density)
How a planting occupies space is separate from material type (seed, plant, pot, …). On the field form, choose a layout; only the pattern panel changes.
- Row planting — classic bed grid (inter-row, in-row, number of rows, row mode). Default on planches. Drawn in the bed pattern panel when a planche is focused — not as a full-bed scatter on the mother Field map
- Group planting — individual points on the zone (e.g. trees, bushes, bed-end herbs). Harvest is at group level; a single plant is a group of one
- Density planting — coverage / density (e.g. green manure, broadcast-style). Dots and stage icons show when that planting’s own zone is selected, not on ancestor overviews
On a planche you may use row, group, or density (e.g. aromatics or cover crop at the bed end). On non-planche culture, new plantings are group or density only (no new row layouts). You can switch layout only while the planting status is planned.
New group points and density coverage stay inside the zone outline. If you later shrink a zone and some group plants fall outside, you are asked whether to delete them, move them to the centre, or leave them (they stay hidden on the map). Zone surface area is computed from the outline when you save geometry.
Planche (bed) row pattern terminology
In Croppit, a long culture bed is often a zone of type culture, planche (French planche = bed). At Terre de Maïa, many planches are about 80 cm across and several metres long (for example the “Planche Ouest Jura / Lac” series). On the map, the date slider redraws the planting pattern for the day you choose.
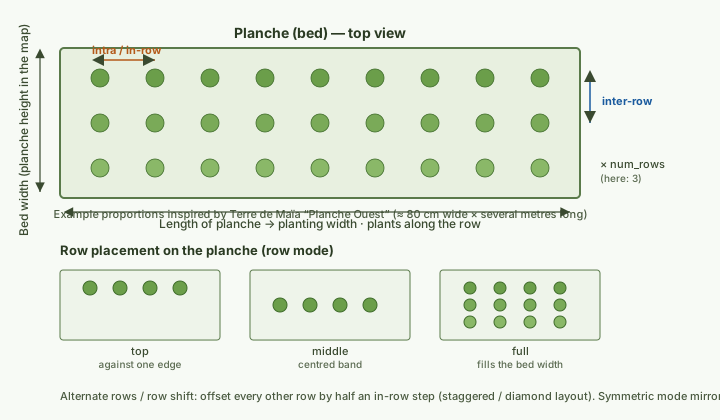
- Inter-row (inter_cm) — distance between parallel rows across the bed width (e.g. ~25–40 cm on multi-row plantings)
- In-row / intra (intra_cm) — distance between plants along the length of the planche (e.g. dense roots ~12 cm; wider plantings 30–60 cm)
- Number of rows (num_rows) — how many parallel lines that planting draws (1 row common; 2–3 when filling the bed)
- Row mode — where the band sits on the planche: top, middle, bottom, full (fills width), symmetric (mirror from both long edges), or free (Y and height independent; default Y=0)
- Alternate rows / row shift — stagger every other row by half a step for a diamond layout (common on mixed beds)
Live examples from Terre de Maïa-style data: a three-row full planting might use ~27 cm inter and ~25 cm in-row; a single middle row of leeks or onions often uses ~24–40 cm inter with tighter or wider in-row depending on the crop. Adjust on the planting form; Show pattern redraws the map.
Nursery tray patterns (Catalog → Tray patterns) are a different tool: they define pot cells (width, height, inter/intra cm for the tray grid), not field planches. Start from a Croppit or farm example to copy dimensions; name and supplier ref stay blank so you create a new tray instead of editing the example. Scale and row-alternate stay in the background.
Crop history
From Field ▾ → Crop history, open a crop-centric timeline of past activity (writers). Useful when planning rotations or reviewing what was grown where.
5. Pots (nursery)
Pots manage greenhouse or nursery production as series → trays → pot plantings.
Seasons
Series are usually named with a date. Croppit groups them into season years: season Y runs from 1 November (Y−1) through 31 October Y. The Pots menu always includes the current season, even before you create the first series.
- New series — start a pot serie (writers)
- Season → All series — list series for that season
- Season → Tomatoes — filter shortcut for tomato work
- Open a series by name to edit the map and plantings
Tracking status
Use track workflows (track pot) to follow nursery status over time. Observers may browse seasons and series but cannot create series or run write tools.
6. Harvest
Harvest is for writers: log what was picked, review lists, and check weekly or yearly stats.
- Open Harvest from the top bar.
- Filter active plantings by family, crop, variety, or zone as needed.
- Log a batch: harvest item, quantity, duration (clock if you use it), harvester, and linked planting.
- Review recent lists and revenue/stats panels.
Harvest items (units and pricing hooks) are private to your organisation. Managers maintain them under Catalog → Harvest items: same picker as the plant catalog, stopped at crop, then the item list.
7. Catalog and reference data
Managers and org admins open Catalog under Admin. The hub is a grid of cards. Plant kinds, families, crops, and varieties share one Plant catalog editor (same picker as the field).
What you can manage
- Plant catalog — picker on the left (type → family → crop → cultivar) and a table under it. Choosing a picker value loads that form. Croppit plant types are read-only unless Croppit is active; your farm can add its own types. Select a type to create a blank family. Edit family / crop / variety only if this organisation owns the row. Listings sit under the cultivar: pick one in the listing menu above the supplier, then save / delete / cancel if it is yours, or choose New listing. See Field → Choosing a variety for search and supplier filter
- Seed suppliers (plant companies) — separate catalog card; on the variety picker, multi-select to filter varieties by supplier (preferred first; Other suppliers folded; org admins set the preferred list)
- Tray patterns for nursery layouts — left list edits your trays; Start from example copies Croppit or farm dimensions into a new tray (name and supplier ref stay blank). Scale and row-alternate stay in the background
- Harvest items — same picker as the plant catalog, stopped at crop (no cultivar / offering); then the item list for that crop
- Zones — create, nest, edit geometry (draw GUI), type tags, location, satellite
- Zone type tags — catalog of system + org tags with multi-language labels (Catalog → zone tags)
- Seed inventory — crop-level listings with stock or a planting in the last 24 months; pick a listing in the variety list to narrow and show the card (lot PMG). Search pick lists that cultivar’s lots
- Check notes — search notes across variety, crop, zone, and date
Zones (map geometry)
Open Catalog → Zones (or the zone manager). On a large screen the map is on the left and the form on the right; on a phone the map appears first. Geometry uses dual input (mouse/trackpad and touch).
- Browse mode — pan, zoom (wheel or pinch), and select zones without changing outlines
- Edit mode — draw or adjust the selected zone: rectangle or polygon, drag corners/vertices, **Arc** tool to pull a segment into a curve (Straighten to flatten), move, rotate about the green anchor diamond
- Update / Add under the map — save geometry explicitly; an Add that was never saved is discarded if you leave or switch away (no zombie zones)
- Surface area — computed from the outline on save (shown for non-pot zones)
- Type tags — chips such as culture or planche (default culture); farms can add private tags; system tags cannot be deleted
- Top areas — set address / GPS (location card) before satellite calibration is offered; size dialog when creating a new root area; Satellite vs blank canvas
- Child zones — drawn in the parent’s local space; when you edit a child, the map shows the parent so placement stays clear
- Open child zone — dropdown lists every direct child (including map-invisible or ghost rows) so you can still open and edit them
- New zone from Field — catalog managers: one-line **Add new zone** at the top of the Field tools column (or Field ▾ → New zone…). The wizard starts with the selected culture zone as parent
Shape history: each successful Update that changes parent, outline geometry, outer placement, or colour stores a revision. Field History as-of can show past outlines and colours. Name/type-only edits do not open a new revision interval.
Delete policy:
- Easy delete — empty zone only (no children, no plantings ever, no notes) — permanent remove; writers OK
- Soft-deactivate (ghost) — when history must remain; hidden on live maps; capacity freed
- Blocked for writers — while active children or active plantings still exist
- Purge (org admin) — permanent cascade of the whole subtree (plantings, notes, harvests, revisions) after email link + password confirmation
Transfer a top area to another organisation (org admin):
- Select a **top / root** culture area (not a child bed, not a pot series) in the zone manager
- At the bottom of the form: **Transfer this area…** — enter the email of an **admin** of the destination farm, optional message, Propose
- Destination admin receives a mail (source org contact and you are Cc’d); they open the link, log in if needed, re-enter password (and 2FA if enabled), Accept or Reject
- While pending: **Resend** (new link) or **Cancel** on the same panel; if mail is delayed, the confirm link may also appear once on screen
- On accept: the whole tree and history (plantings, harvests, notes) move to the other org; nursery pot series stay; seed stock and shop stay
- Shared Croppit catalog crops/varieties are **not** copied; only private catalog rows used on that tree are copied for the destination
- If propose fails (yellow alert on the panel): often the destination is already at its **root area limit** (trial/home often one root) — free capacity there or upgrade, then try again. No email is sent until propose succeeds
The Field map shows saved geometry (and History as-of when you scrub the date). Drawing and reshaping zones is done in the zone manager, not on the Field planting map. Moving a zone to a different **parent within the same org** (reparent) is not available yet — that is separate from transferring a whole top area to another organisation.
8. Account and organisation
Account
Admin → Account covers profile, security (password, 2FA), language preference, organisation switcher, leave organisation, cancel account, and (on a phone or tablet browser) how to add Croppit to the home screen.
- Cancel account — tick the box and request a deletion email (platform root accounts cannot be deleted here)
- Open the email link — a confirmation page opens; the account is still active
- Only after you tick the final box and submit (plus browser confirm) is the account permanently removed
- Ignore the email or choose “Keep my account” if you change your mind
Organisation settings
Org admins open Admin → Organisations to edit the farm profile (name, contact, address, logo), preferred seed/plant suppliers, membership (add/remove users and roles), and whether observers may self-join. Platform admins can also create and manage organisations globally, assign capacity tiers, and delete organisations.
- Preferred suppliers — tick which houses appear first in the variety picker supplier menu. Your own organisation is always preferred. The picker default filter is all preferred; All available still shows every house. Field / pots offering lists follow that filter; the flip-card is not filtered
- Delete organisation (paid / higher tiers) — dual email confirmation: org contact (if set) and platform root / platform admin; both must open their links before data is purged
- Free tier (trial) — platform or croppit root can delete immediately after UI confirm (“Delete now…”); no contact or root confirmation emails
- Protected orgs (croppit shared catalog, Terre de Maïa seed farm) cannot be deleted
9. Shop (staff setup)
Each farm can run its own self-service shop. Shop data never crosses org boundaries. This section is for staff who configure the shop. Help for people buying at the tablet is a separate guide.
Customer “how to buy” help: open Shop help (?what=shop_help), or tap Help next to the language button on the kiosk. That guide uses simple steps for shoppers and is not part of this farm manual.
Shop administration
Admin → Shop opens the shop hub. A secondary bar jumps between hub/settings, products, sections, tags, kiosks, scales, terminals, sales, and Sell (staff POS).
- Products / sections / tags — what customers see (multi-language names EN/FR/DE/IT/JA; optional Grok Imagine icons)
- Kiosks — define devices, issue a short-lived activation code (about 2 minutes), remote deactivate, connectivity log
- Scales — optional weight API; assign a default scale per kiosk; POS always allows manual kg when enabled in settings
- Terminals — SumUp Solo account (Merchant ID, App ID, encrypted API keys) and card readers; assign one reader per kiosk
- Sales — list and void when needed
- Payments for customers: cash envelope, manual Twint, card when a terminal is configured (customer credit ledger is not available yet)
- After a sale, the thank-you screen can offer an optional email receipt — the address is not stored; thank-you idle is short (~30s, extended while typing an email)
SumUp secrets are stored encrypted. The server needs $shop_crypto_key in config.local.php before you can save API or affiliate keys under Terminals.
Activate a kiosk tablet
- On the tablet (signed out), open Activate as kiosk (guest page — no login).
- Choose organisation and kiosk definition.
- On a staff computer, Shop → Kiosks → Activate (code). The code expires in about two minutes.
- Type the codeword on the tablet. There is no QR pairing.
- The tablet is sell-only until you remote-deactivate it (which also clears open carts for that device).
On the POS, customers use Help (next to language) for buying steps — separate from this farm manual. Welcome splash can show an optional short tutorial video (manual play only, no autoplay). Idle: splash goes black after ~2 minutes (tap to shop); unfinished basket clears after ~5 minutes; payment returns to basket after ~2 minutes idle. Offline screens distinguish “no internet” from “Croppit unreachable”.
Staff personal sell uses Shop → Sell and keeps the normal session (exit back to the farm app). Customers never log in on the kiosk.
10. Security and good practice
- Sign out on shared computers
- Do not share activation codes beyond the tablet you are pairing
- Observers should not be given writer roles if they only need to browse maps
- Forms and AJAX are protected by CSRF automatically — if a form fails with a security message, reload the page and try again
- Never put passwords or API keys into notes or product descriptions
11. Connected apps and API
Croppit can give a trusted assistant (or a script) read-only access to one organisation. You approve this in the browser; the app never sees your password.
- Admin → Account → Connected apps and API lists every grant and personal token
- Choose the organisation at consent time — a token never sees another farm
- You cannot connect an assistant to the shared Croppit catalog organisation; shared variety names are still readable through a farm grant
- You can tick only the data you want (zones, harvests, catalog, …)
- Revoke any time; access stops immediately
- Personal access tokens have a name you choose, are shown once, and work on api.php (Authorization: Bearer …)
Shop kiosk tablets cannot create API access. Writes (new plantings, harvest logs) are not available through the API yet.
12. Known limits
- Zone reparenting within the same organisation (change parent) has no dedicated screen yet — transferring a whole top area to another organisation is available (org admin, zone manager)
- Drawing geometry on the Field map itself is not offered — use Catalog → Zones
- Row plantings are not newly created on non-planche culture (legacy rows kept but not drawn on the field map)
- Tray patterns are in Catalog; other catalog pattern kinds may not appear in the hub yet
- Shop customer credit / monthly ledger is not available yet (cash, Twint, and card only)
- The OAuth API and MCP adapter are read-only in this version (no planting or harvest writes from assistants)
- Mail (invites, password reset, shop receipts, account/org deletion confirm) uses host SMTP (noreply@ site address); free-tier org delete by platform root skips those emails
13. Legal and this manual
Legal notice, privacy, and cookies are in the site footer (Legal). This user manual is product documentation only; it is not a contract.\n\nSoftware publisher: Legio Sapiens Sàrl. Farm data is operated with each participating organisation (for example Terre de Maïa Sàrl and others).
Farm manual body text is available in English and French. German, Italian, or Japanese UI may still fall back to English for this pack until those translations exist. Shop customer help has English and French packs plus a short French tutorial video; other languages fall back to English for that guide.